booleansplit.com

photos, tips, tricks, and thoughts from an avid amateur photographer


Archive for technique

studio shoot

imgp31251

My industrial design class just completed their semester-long power equipment design project culminating with the building of full-scale appearance models. I set up a make-shift photo studio in a lightly used classroom and over the past 24 hours shot over 600 images. All were taken in RAW format (DNG) with my Pentax K10D and my 18-55mm kit lens and FA 35mm f/2 AL and processed in Adobe Lightroom. By shooting in RAW I was able to set the white balance for all the shots with one click by selecting an underexposed portion of the white backdrop with the eye dropper tool in Lightroom and then copying and pasting that setting to all images.

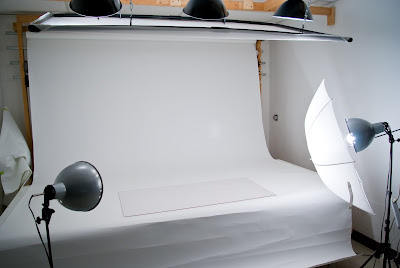
Most of the shots required a heavy dose of positive exposure compensation while shooting to keep the white backdrop white and not grey. I was pretty diligent with the use of the histogram while shooting so there wasn’t much need for exposure adjustment. I just made sure there was a good spike on the right hand side of the graph without going very far into the mid tones. Here’s a shot of the “studio” set-up:

imgp2988

I positioned the white paper backdrop centered under a row of fluorescent lights so that there was a row flanking the backdrop on either side. This provided nice even lighting front to back and reduced shadows to a minimum.

For each of the 14 students I took anywhere from 40-70 shots (all hand-held @ ISO 400). I started with low-angle orthographic views at a medium focal length (35-45mm) followed by eye-level perspective shots at a wider angle (35-24mm), short depth of field detail shots (to hide any imperfections), and specialty shots as required (use, high angle, ultra-wide low angle perspective, etc.). All in all I was really pleased with the results right out of the camera and I think the students ended up with great shots for their portfolios.

Unfortunately, the confidentiality agreement I signed prevents me from showing most of the shots or even revealing the client or other interesting project details, but here are a few ambiguous detail shots of the final models to show what I was able to achieve with this make shift DIY studio set-up:

imgp3197

imgp3246

imgp3343

Oh, and I have over 2,000 photos that I have taken of the students working on their projects this semester that I need to burn off onto DVDs within the next week!

’round back

'round back

Pentax K10D, Pentax SMC-A 50mm f/1.7 (manual focus), ISO 100, f/8, 30 sec, +/-0 EV, IS off

Taken in an alley behind an apartment building on Historic Highland Avenue in Birmingham, AL. I was drawn to the combination of lighting (sodium vapor and mercury vapor), the texture of the brick and the arrangement of the trash cans. This photo was taken with my Pentax K10D and my old manual focus 50mm f/1.7 lens on a Joby Gorillapod. I set the camera to manual mode, selected ISO 100 (for minimum noise), Auto white balance, 30 second shutter (maximum shutter time in manual mode), f/8 aperture (for maximum sharpness), and set the self timer to the 2 second delay position (to eliminate camera shake when the shutter opens). I manually set the focus at infinity and didn’t bother checking the light meter reading. Since I shoot these shots with the long exposure noise reduction turned off, I was able to review the shot immediately and saw that it was good on the first try. The alley was a lot darker and creepier than this photo suggests so after one shot I grabbed up my camera and kept moving… More »

Designing Green 2009

Designing Green trophy

Pentax K10D, SMC PENTAX-DA f/3.5-5.6 18-55mm AL @ 18mm, ISO 160, f/4, 1/30 sec, +1 EV, IS on

Read all about Auburn University’s Department of Industrial and Graphic Design’s annual Designing Green competition on my personal blog.

Designed by Aran Mun, the hand-made laser cut cardboard trophy above was shot in a simple whitespace studio with a single incandescent bulb behind a white umbrella diffuser (reversed from the set-up shown below):

RAW file processed in Adobe Lightroom to correct white balance and tweak the exposure slightly. I shot another version at f/8…

imgp9983

…but I preferred the way the vignetting and shallower DoF in the f/4 shot really adds depth to the photograph and focuses your attention on the logo. Best thing about having access to a studio like this is that the total time to set up for this shot and snap the four frames I took was less than 2 minutes!

Click here if you’re just interrested in seeing all the photos I took during the event.

speak to me

speak to me

Pentax K10D, Pentax SMC-A 50mm f/1.7 (manual focus), ISO 800, f/1.7, 1/50 sec, +0.7 EV, IS on

Speak to me…as in little green men from outer space ;-) This image makes me think of Close Encounters of the Third Kind. Taken in the bar at the MGM Grand casino in Las Vegas. The Centrifuge bar (as it is known) is designed around a central cylinderical tower covered in tiny color changing LED or fiber optic lights. I was sitting about 12-15′ away from the bar when I took this relaxing from 3 days of walking the show floor at PMA. I simply manually set the focus on my 50mm lens (at f/1.7) to around 3′ and let the camera do the rest. Shooting bokeh is really one of the easiest things to do once you understand the technique. The hard part becomes making an actual composition out of the bokeh. In this case the arrangeent of the lights themselves was all I needed. Tomorrow I’ll have another example shot in the same place.

layover

layover
Pentax K10D, Pentax SMC-A 50mm f/1.7 (manual focus), ISO 800, f/1.7, 1/60 sec, +0.7 EV, IS on

Sitting in the Southwest Airlines C gate departure lounge at Las Vegas international Airport yesterday this is pretty much what I was seeing through my glazed-over post-PMA eyes. This image is pretty much SOOC (straight of out of the camera). I did apply my standard Lightroom import processing but didn’t have to do much else. For the shot I just opened up the aperture, focused on the backrest of the seat across the aisle from me, recomposed and shot. The large aperture took care of blurring out the background and created the nice bokeh balls from all the lights. The sun had set behind me about 20 minutes before so I got a nice blue hour band through the east facing windows in the background. This is the original composition:

imgp9292

It took a few tries to get the focus right but I figured I had a pretty good shot on about the third or fourth try. A few minutes later, the gentleman on the right walked up, sat down in the second row and pulled out his headphones and I knew that the shot I was looking for had finally materialized.

Shooting in airports is one of my favorite locations but they can be a mixed bag. There is so much to see and so many walks of life confined in a relatively small and typically interestingly designed space. However, you have to be careful of invading peoples’ privacy too much since there’s usually nowhere to run and hide. Shooting shots like this though, can be quite innocent as most people are lost in their own little iPod-isolated world. Also, if they give you a hard time you can show them the shot and prove that they’re nothing more than background texture ;-)

Technical difficulties involve poor and variable lighting conditions and constantly moving subjects. I tend to set my Pentax K10D’s auto ISO to 100-800 (or maybe 1000) and shoot in RAW so I can tweak the white balance later if needed. Generally I like to use my old 50mm lens left wide open at f/1.7. It is small with decent reach and not nearly as imposing as a larger and longer lens might be. Personally, I think Pentax’s SMCP-FA 77mm f/1.8 Limited lens would be a better choice for this type of photography. It is just as small and fast, sharper wide open, has longer reach, and is autofocus. Autofocus here is nice as it allows you to compose and shoot much faster with better accuracy than a manual focus lens (at least for me). That way you draw less attention to yourself while taking pictures.

Anyway, next time you find yourself at the airport, take your camera out of your bag and see what you can get! Here’s a few more that I took:

imgp9288

13 second exposure @ f/16. Camera was set on window sill and triggered with the 2 second delay self timer.

imgp9285

Tram passengers.

imgp9276

This shot was taken at f/4 to give a bit more DoF and sharpen things up a bit.

imgp9273

This was shot from the hip and I knew it would be out of focus but somehow it still works.

imgp9268

Waiting in line at the ticket counter. The shutter release caused him to turn around but I feigned taking a picture of the ceiling to avoid conflict ;-)

About

I'm an industrial designer and an avid hobbyist photographer. People are always asking me "how'd you do that?" So, I decided to create this site as a place to share my experiences and insights about photography, the gear and what it all means to me. I'm not sure if this site will make anyone besides myself a better photographer but I figure it's worth a try. Take a look around and let me know what you think. Thanks for stopping by!

Subscribe

Recent Posts

Categories

Pages

Flickr Friends

Links

My Sites

Archives