booleansplit.com

photos, tips, tricks, and thoughts from an avid amateur photographer


Archive for technique

Blue Hour made simple

Magic City sunset

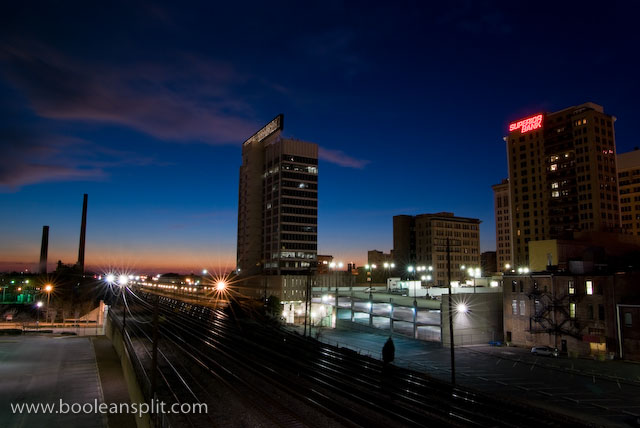
I’ve already blogged here once about taking sunset photos but after taking this blue hour shot tonight I just had to share how easy this is.

I had to run downtown around 6pm to pick up some fresh oysters from the Fish Market. On the way out the door I grabbed my Pentax K10D, 16-50 f/2.8 DA* (borrowed) and tripod. I made a bee line down 21st Street South (past the Fish Market) to the viaduct that goes over the railroad tracks into downtown. From this elevated vantage point over the tracks I knew I would have a decent view west with enough streetlights for some killer starburst action.

Here’s the set-up for this shot:

  • camera mode: MANUAL (you can’t do this in AUTO!)
  • aperture: f/22
  • shutter speed: 30 seconds
  • ISO: 100*
  • white balance: AUTO
  • flash: OFF (!!)
  • IS: OFF
  • auto focus: OFF (manually set focus to ∞)
  • self timer: ON (2 second delay)
  • focal length: widest setting (here: 16mm)
  • battery: fully charged (!)

*Nikon users with ISO 200 as the lowest setting may have to back off the shutter to 15-20 seconds.

That’s it. Mount the camera on a tripod, compose the shot, trip the shutter (using the self timer prevents camera shake), step back, and wait. If you time the light right that’s all you’ll ever have to do. The small aperture ensures everything is in focus and creates dazzling starbursts. The long exposure pulls in all kinds of light and colors and the low ISO keeps things s-m-o-o-t-h. I did shoot this photo in RAW but all I did in Lightroom to this shot is apply my standard import settings and touch up a little sensor dust.

Truthfully, I rarely look at the exposure meeter for these shots. I usually just take a 30 second f/22 shot at ISO 100 and check the LCD. If it’s too dark I’ve probably missed the magic blue hour and it’s either time to pack it up or break out the DIY bulb switch (though I usually try a few in vain at f/16 and f/8 just to be sure). If the shot is too bright I’ll just back off the shutter to 15 seconds and try again. If that doesn’t work I just wait a bit until the light drops off some more. The only real hard part is getting the timing right (most people are packing up to leave about the time I’m setting up for my best shots) and being patient (30 second exposures can seem like an eternity sometimes).

It’s really one of the few never-fail shots if you use these settings. Trick is you pretty much have to use all of these settings to get decent results. Break out the tripod and give it a try tomorrow night!

Here are a few more examples on my Flickr stream if you’re interested.
Why do I shoot RAW?

Here’s a recent quote from Ken Rockwell’s blog:

The Canon 5D Mark II’s in-camera JPG processing is awful if you’re making huge prints. The in-camera processing of the raw data oversharpens harsh edges, adds too much contrast and smudges subtle textures into mush.

For the Canon 5D Mark II, if you’re making huge enlargements, shooting CR2 files and processing them with Adobe Lightroom 2.2 makes a world of improvement over in-camera processing. Shooting CR2 files in the 5D Mark II and processing them in Lightroom 2.2 makes files almost indistinguishable from the JPGs that come directly out of the Nikon D3X.

I find this quite amusing as Ken is infamous for bashing anyone who shoots RAW as a hack. Read his article on RAW vs. JPEG to see what I mean. If you can get beyond all of his opinions there is some pretty useful information in there.

Personally, I pretty much agreed with Ken and shot JPEG exclusively up until last year. I switched to shooting RAW with my Pentax K10D and post processing with Adobe Lightroom when I discovered how much better the RAW images looked coming out of Lightroom as JPEGs than they ever did coming out of the camera. The thing that makes it work for me is that I know the camera so well that I can picture what post processing adjustments I am going to need to do to an image as I’m peering through the viewfinder… much the same way a good film photographer considers how they will later develop and print an image in the darkroom.

I have lens specific import presets for my K10D’s RAW files that automatically apply my preferred adjustments during import (Sharpening, Detail, Clarity, Vibrance, Noise Reduction, Defringing, etc.). I shoot in auto white balance mode so all the post processing I have to do is make any required adjustments to the WB where the camera missed (which happens more often than not. Often, I can do this quite simply with a large number of images shot in the same light with less than 3 clicks (click on the first image, shift-click on the last, click on the WB pull-down tab, scroll to the correct WB preset and release). I certainly fail to see how this can be any more time consuming than fiddling with the in-camera WB settings while shooting.

I don’t recommend shooting RAW for beginners. Post processing can be a quagmire where inexperienced photographers often get lost and discouraged. However, once you get to the point that you can see what kinds of adjustments an image might need before you even release the shutter, shooting RAW starts to make a lot of sense. Used wisely, RAW images can open up a whole new world of creative and critical control. Best of all, you can always reset the image back to the default as-shot capture and do it all over again- all without creating multiple JPEG files to keep track of and store.

If you want to get an idea of what shooting RAW will do for your core image quality, look up the review of your camera on dpreview.com and navigate to the “Compared to (JPEG)” and “Compared to (RAW)” sections.

Camera Dojo just posted a pretty in-depth article on the same subject that is worth taking a look at.

About

I'm an industrial designer and an avid hobbyist photographer. People are always asking me "how'd you do that?" So, I decided to create this site as a place to share my experiences and insights about photography, the gear and what it all means to me. I'm not sure if this site will make anyone besides myself a better photographer but I figure it's worth a try. Take a look around and let me know what you think. Thanks for stopping by!

Subscribe

Recent Posts

Categories

Pages

Flickr Friends

Links

My Sites

Archives