booleansplit.com

photos, tips, tricks, and thoughts from an avid amateur photographer


Posts tagged evening

season’d

season'd

Pentax K10D, SMC Pentax-DA 35mm f/2.8 Macro Limited, ISO 400, f/2.8, 1/50 sec, +0.7 EV, IS on

Couple of things to report here. First, the image above was shot with a Pentax DA 35mm f/2.8 Macro Limited lens that I am testing. The studio shots have been taken and now I just have to spend a few days living with it to see how it works for me. In case you were curious, whenever I get a loaner lens to test I put it on my camera and take it with me everywhere I go for several days. By forcing myself to use it for all of the various photos I take I can get a really good sense of how it performs within a couple hundred frames shot over just a few days.

Initial out-of-the-box impressions are that this is a very nicely put together lens that is absolutely the sharpest lens I’ve ever used. I really like the field of view the 35mm focal length gives on my K10D (52.5mm equiv). As a macro lens you can (read: have to) get crazy close to subjects. It’s actually quite a bit like using my DIY super macro set-up without all the fumbling around. Look for my typical in-depth user review in a few days.

Second, this image was processed using a brand-new copy of Adobe Photoshop Lightroom 2.3 that the folks at Adobe sent over. I’ve been using Lightroom 1.4 all this time and I’m excited to explore the features of this new-and-improved version. I’ll be reporting on my impressions of LR 2.3 later. I can say that the upgrade was completely seamless and I haven’t missed a beat.

The image above was shot in RAW with my Pentax K10D in Aperture Priority mode. White balance was set to Auto as was the ISO. In Lightroom I imported the image using my default develop settings. I then cropped it and applied the Direct Positive preset. Finally, I tweaked the White Balance to bring out the blue hue of the evening light and dialed up the Vibrance a touch to get it to pop a bit more. The sharpness is mostly due to the lens.

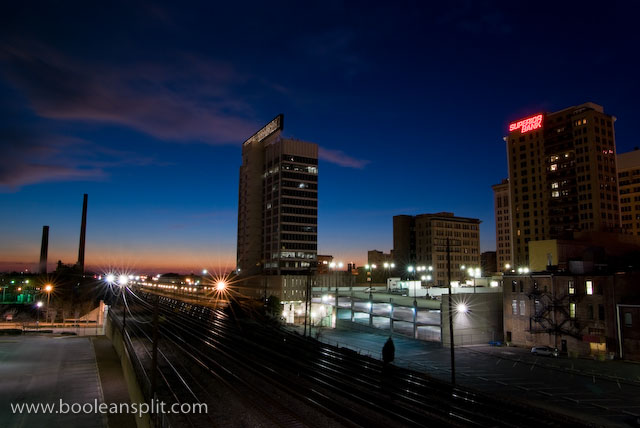
Blue Hour made simple

Magic City sunset

I’ve already blogged here once about taking sunset photos but after taking this blue hour shot tonight I just had to share how easy this is.

I had to run downtown around 6pm to pick up some fresh oysters from the Fish Market. On the way out the door I grabbed my Pentax K10D, 16-50 f/2.8 DA* (borrowed) and tripod. I made a bee line down 21st Street South (past the Fish Market) to the viaduct that goes over the railroad tracks into downtown. From this elevated vantage point over the tracks I knew I would have a decent view west with enough streetlights for some killer starburst action.

Here’s the set-up for this shot:

  • camera mode: MANUAL (you can’t do this in AUTO!)
  • aperture: f/22
  • shutter speed: 30 seconds
  • ISO: 100*
  • white balance: AUTO
  • flash: OFF (!!)
  • IS: OFF
  • auto focus: OFF (manually set focus to ∞)
  • self timer: ON (2 second delay)
  • focal length: widest setting (here: 16mm)
  • battery: fully charged (!)

*Nikon users with ISO 200 as the lowest setting may have to back off the shutter to 15-20 seconds.

That’s it. Mount the camera on a tripod, compose the shot, trip the shutter (using the self timer prevents camera shake), step back, and wait. If you time the light right that’s all you’ll ever have to do. The small aperture ensures everything is in focus and creates dazzling starbursts. The long exposure pulls in all kinds of light and colors and the low ISO keeps things s-m-o-o-t-h. I did shoot this photo in RAW but all I did in Lightroom to this shot is apply my standard import settings and touch up a little sensor dust.

Truthfully, I rarely look at the exposure meeter for these shots. I usually just take a 30 second f/22 shot at ISO 100 and check the LCD. If it’s too dark I’ve probably missed the magic blue hour and it’s either time to pack it up or break out the DIY bulb switch (though I usually try a few in vain at f/16 and f/8 just to be sure). If the shot is too bright I’ll just back off the shutter to 15 seconds and try again. If that doesn’t work I just wait a bit until the light drops off some more. The only real hard part is getting the timing right (most people are packing up to leave about the time I’m setting up for my best shots) and being patient (30 second exposures can seem like an eternity sometimes).

It’s really one of the few never-fail shots if you use these settings. Trick is you pretty much have to use all of these settings to get decent results. Break out the tripod and give it a try tomorrow night!

Here are a few more examples on my Flickr stream if you’re interested.

About

I'm an industrial designer and an avid hobbyist photographer. People are always asking me "how'd you do that?" So, I decided to create this site as a place to share my experiences and insights about photography, the gear and what it all means to me. I'm not sure if this site will make anyone besides myself a better photographer but I figure it's worth a try. Take a look around and let me know what you think. Thanks for stopping by!

Subscribe

Recent Posts

Categories

Pages

Flickr Friends

Links

My Sites

Archives